" height="25.009532945929074px" id="VwwY3mrjo" transform="translate(67.265 8.261)" width="174.35694959747616px"/><path d="M 0 28.105 L 2.887 33.959 C 2.887 33.959 12.485 29.311 20.121 21.297 C 25.491 15.66 29.821 8.391 29.742 0 L 23.175 0 L 23.176 0.06 C 23.239 6.702 19.594 12.361 15.342 16.823 C 8.542 23.96 0 28.104 0 28.104 Z" fill="rgb(255, 215, 68)" height="33.95941481831052px" id="jB7csOXeH" transform="translate(0.015 0)" width="29.743382867321948px"/><path d="M 15.173 8.082 C 8.886 2.906 2.887 0 2.887 0 L 0 5.853 C 0 5.853 5.061 8.31 10.493 12.696 C 11.69 11.672 12.835 10.589 13.924 9.451 C 14.35 9.004 14.766 8.548 15.172 8.082 Z M 17.891 20.078 C 20.953 23.997 23.225 28.641 23.177 33.899 L 23.177 33.959 L 29.749 33.959 C 29.816 26.898 26.755 20.631 22.582 15.462 C 22.242 15.843 21.896 16.218 21.545 16.587 C 20.38 17.805 19.162 18.97 17.893 20.078 Z" fill="rgb(255, 255, 255)" height="33.95941493811614px" id="iDcNSACbb" transform="translate(0 6.038)" width="29.750188431772767px"/><path d="M 29.754 5.855 L 26.867 0 C 26.867 0 17.268 4.648 9.633 12.663 C 4.261 18.298 -0.077 25.568 0.001 33.959 L 6.575 33.959 L 6.575 33.898 C 6.514 27.257 10.158 21.6 14.41 17.136 C 21.21 9.999 29.753 5.854 29.753 5.854 Z" fill="rgb(255, 255, 255)" height="33.95865974516281px" id="Gu0pQRLhU" transform="translate(23.183 6.038)" width="29.753951736258358px"/><path d="M 11.865 13.892 C 10.596 14.999 9.378 16.163 8.215 17.38 C 7.864 17.749 7.516 18.124 7.175 18.507 C 2.999 13.335 -0.065 7.066 0.001 0 L 6.573 0 L 6.573 0.06 C 6.523 5.323 8.801 9.969 11.864 13.892 Z M 14.567 25.868 C 14.974 25.403 15.39 24.946 15.816 24.498 C 16.905 23.361 18.049 22.279 19.246 21.256 C 24.682 25.646 29.749 28.105 29.749 28.105 L 26.862 33.959 C 26.862 33.959 20.857 31.05 14.567 25.869 Z" fill="rgb(255, 215, 68)" height="33.95941600574531px" id="YH8xPQKdu" transform="translate(23.184 0)" width="29.749432445056243px"/></g></svg>)
" height="4px" id="biusmS922" transform="translate(0 18)" width="40px"/><path d="M 0 2 C 0 0.895 0.545 0 3 0 L 37 0 C 39.455 0 40 0.895 40 2 L 40 2 C 40 3.105 39.455 4 37 4 L 3 4 C 0.545 4 0 3.105 0 2 Z" fill="rgb(255, 255, 255)" height="4px" id="xgv2z8zeC" transform="translate(0 28)" width="40px"/><path d="M 0 2 C 0 0.895 0.545 0 3 0 L 37 0 C 39.455 0 40 0.895 40 2 L 40 2 C 40 3.105 39.455 4 37 4 L 3 4 C 0.545 4 0 3.105 0 2 Z" fill="rgb(255, 255, 255)" height="4px" id="bqvI5dZGP" transform="translate(0 8)" width="40px"/></svg>)
Getting Started with GameFabric: How to Create an ArmadaSet for a Multi-Region Fleet

Welcome to Getting Started with GameFabric!
After completing this crash course, you’ll have a session-based server fleet that scales automatically and keeps a pre-warmed pool of servers ready the moment your matchmaker calls.
What you’ll need:
An Environment and Region set up (Getting Started with GameFabric: Environments & Regions)
A container image pushed to a Branch (Getting Started with GameFabric: Branches & Images)
If you’re using a matchmaker: Managed Allocators

An Armada is a session-based fleet of game servers in a particular Region. They automatically scale up or down based on your actual player demand. Armadas retain a pre-warmed buffer pool for instant matchmaking and naturally shut down when the session ends. You don’t have to manage individual instances, Armadas handle it all for you.
ArmadaSets are your global configuration template. One ArmadaSet drives your entire mult-region fleet. GameFabric creates an Armada for each Region you configure, all sharing the same autoscaling rules and capacity planning. Tune your ArmadaSet and your changes roll out across every Armada within it at once. A typical use case for an ArmadaSet is one per game mode (like Team Deathmatch or Free-for-All) or one per game Branch (like QA or Test) where each is independently configured, scaled, and deployed globally.
If a persistent server is where you’re headed, or you'd like to test how your game server runs, see Getting Started with GameFabric: Vessels.
Let’s launch your fleet, captain!

Make sure you’re logged into GameFabric in your browser to access the UI. Then, in the left sidebar, click on ‘ArmadaSets’ under Dynamic Fleets.
Setting up an Armada follows the exact same process as setting up an ArmadaSet (global fleet management). You navigate to Armadas on the left sidebar under Dynamic Fleet. However, we recommend using ArmadaSets for convenience, as an ArmadaSet will automatically populate Armadas in your desired Regions with a shared configuration across clusters.
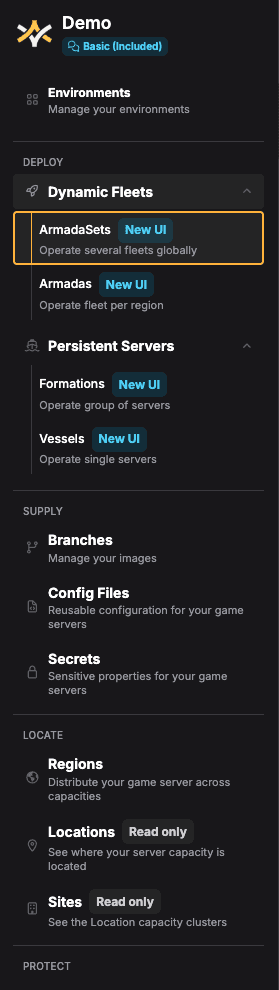
You’ll be taken to the following dashboard.

Here, you’ll be able to access the ArmadaSets you have set up that will house all your various Armadas across your Regions, within their respective templates.

Click ‘+ Create New ArmadaSet’ in the center of the page. You’ll then be walked through some choice customization options to get your fleet up and running.
General
First is your General information.
Name (required) — give your ArmadaSet a name and make sure it’s unique to any others you may have or intend to make. A good rule of thumb is to reference its stage in your production pipeline and the region it will service (e.g., prod-eu).
Description (optional) — it’s recommended to write a brief description of your ArmadaSet to give your team better insight into what it’s for explicitly (like a certain map or game mode).
Game Server Labels (optional) — these are key/value pairs your matchmaker can filter on during allocation. Useful when you need to route players to specific server types, but we don’t need these for now.
Tag (optional) — this is a short label that appears next to the ArmadaSet name in the UI. Useful for organizing multiple ArmadaSets at a glance, but we’ll skip it here.
Hit ‘Next’ to continue.
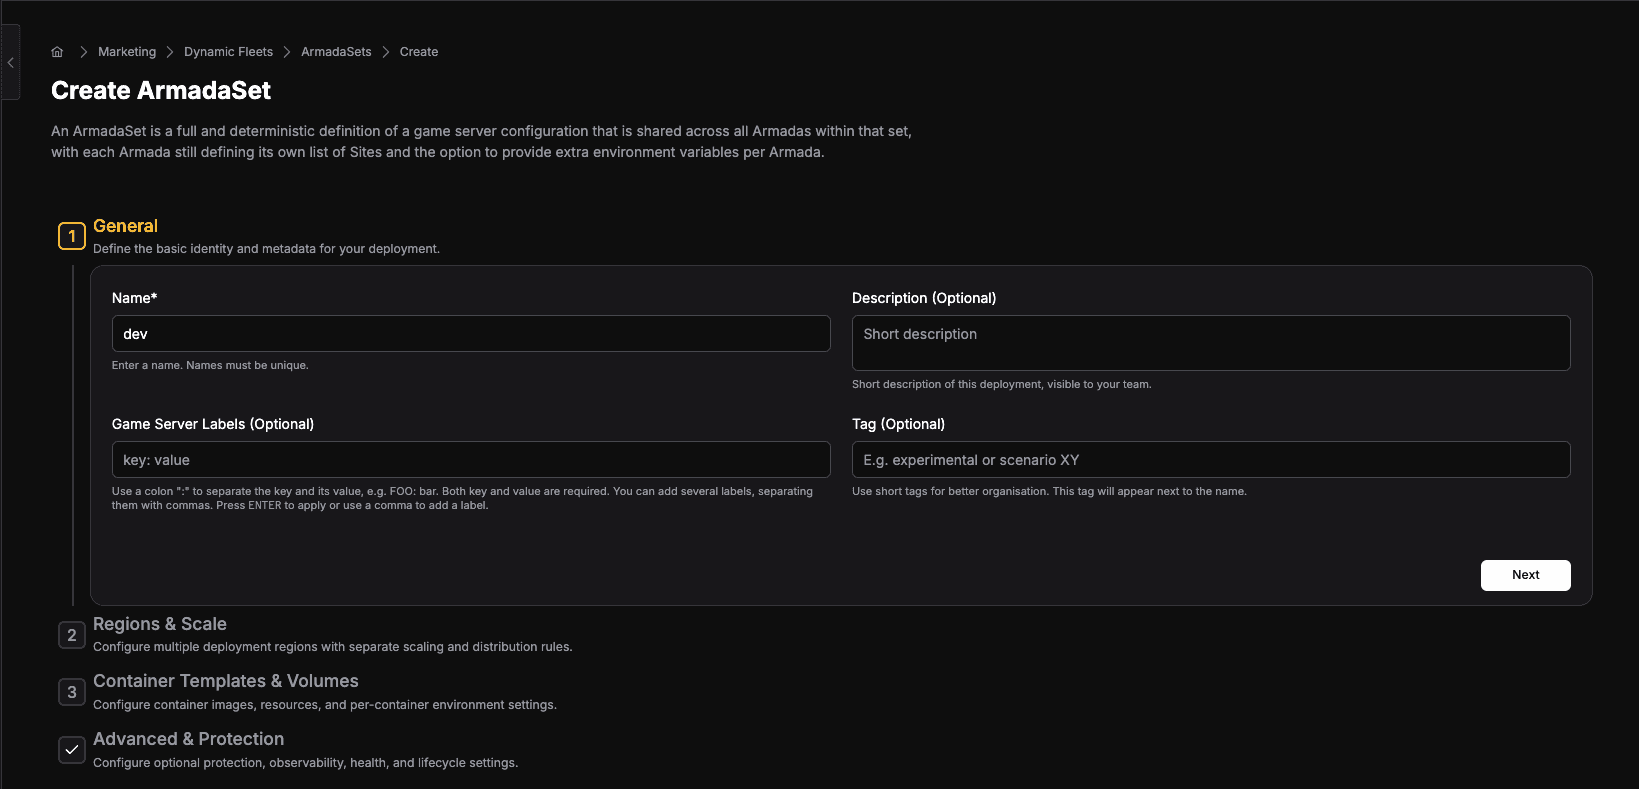
Regions & Scale
Now it’s time to set the Regions you want your ArmadaSet to populate with Armadas, the infrastructure types it will run on (bare metal, cloud), maximum replicas, and your safety buffer.
In the Region* dropdown menu at the top, select your available Regions or just the one you want to test on. For our purposes, we will operate in Europe West.
Then, you’ll want to choose your Infrastructure Type. You can run Armadas across both bare metal and cloud. So feel free to choose one, the other, or both for optimal performance and scaling.
We’ll go ahead and select Frankfurt baremetal and GameFabric Cloud through GCP.
Max Replicas
This is your hard ceiling on servers per Region Type. It must be at least as high as your Safety Buffer and Minimum (Min) Replicas. Set a ceiling that stays within your budget at peak.
Safety Buffer
This represents the number of servers kept in a ‘Ready’ state. It’s what lets your players get into a match without waiting for a server to boot. Base it on your expected concurrent users and average session length — you can always tune as you go!
Min Replicas
For us, we’ll just say 2 Max Replicas and 2 Safety Buffer across, and leave Min Replicas unadjusted.
Note: GameFabric offers Dynamic Buffers for automatic adjustments to your server pool based on real demand and Scale-To-Zero which shuts down unused cloud capacity automatically and brings it back online only when you need it.
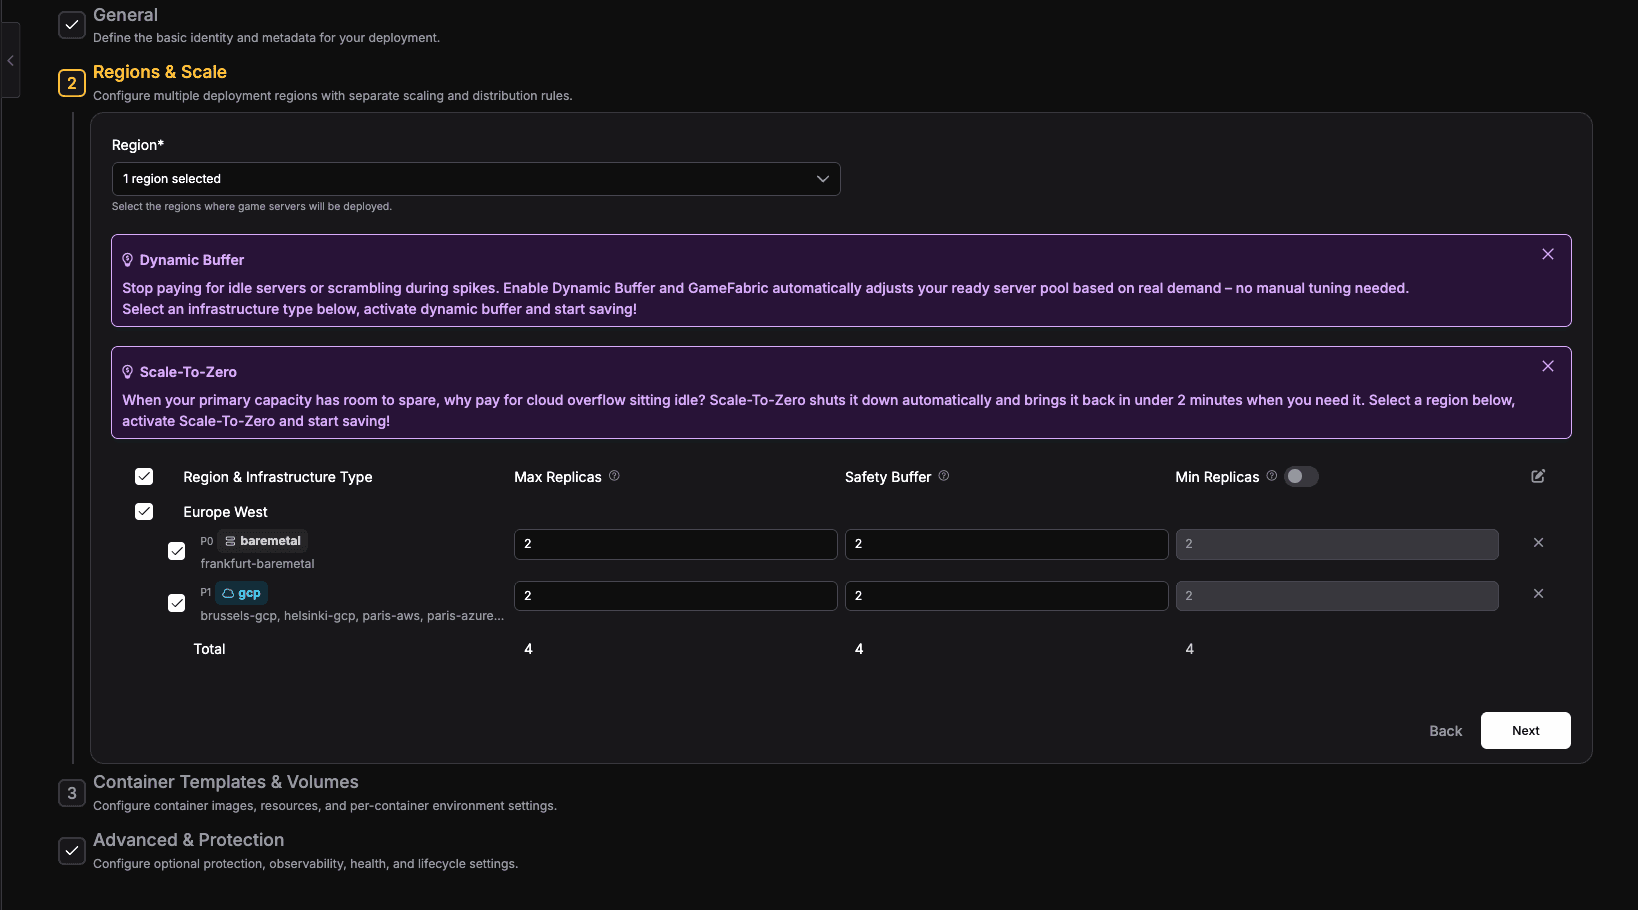
Once you’ve gotten your Region and Region & Infrastructure Type set up, continue by clicking ‘Next’.
Container Templates & Volumes
You’ll land on the third step with a variety of options and room for customization, but it’s fairly straightforward. If you followed our Getting Started with GameFabric: Vessels guide, this should look familiar.
We’ll walk you through exactly what you need to fill in, and a few things you may want to take note of for the future:
Required — just follow these steps and you’ll be good to go:
Name — this locks as ‘default’, tied to the name of your ArmadaSet in the Step 2.
Branch — Select the Branch you wish to take your image from. If you followed our Getting Started with GameFabric: Branches & Images guide, you should have a Branch with an image already.
Select Image — Select the image you assigned to your Branch
Select Tag — Select the specific image version you want to use for the ArmadaSet
Container ports — Add at least one port for your game server:
Policy — ‘Dynamic’ (recommended): a random, fixed public port is assigned at runtime while your server binds to its expected fixed local port.‘
‘Passthrough’: public and local port match
Name — an identifier for this port, used in API references and logs
Port — the local port your game server binds to
Network Protocol — TCP or UDP, depending on your game’s transport layer
Protection Protocol — None or TCP
Compute Resources — the resources guaranteed to your Armadas in this ArmadaSet, used for scheduling. Reflect real usage, as a server scheduled on a node without enough free resources won’t start!
CPU Request — the minimum CPU guaranteed to your Armadas. Enter a value, then select your unit from the following dropdown. If you’re unsure, millicores is the more precise option.
Millicores — For finer control (e.g, 500 = half a core)
Cores — For whole numbers (e.g., 2 = two full cores)
Memory Request — the minimum guaranteed amount of memory for a container. Enter a value, then select your unit.
Mi — mebibytes; M is the decimal equivalent.
Gi — gibibytes; G is the decimal equivalent.
Optional — We won’t cover these in this guide, but read below for those who want greater control of if you’re interested in additional functionality:
You’ll note a toggleable button labeled ‘Advanced Settings’ here. This reveals optional CPU Limit and Memory Limit fields. These are not recommended at this stage.
Command — overrides your Dockerfile’s ENTRYPOINT. Skip unless you need to change startup behavior without rebuilding.
Args — overrides CMD from your Dockerfile. Skip this unless you need custom startup arguments.
Environment Variables — variables to pass to the container, overriding image defaults.
Volumes — temporary shared storage across containers, cleared when the server stops.
Config Files — mount configuration files at a specified path inside the container; changes to the source files are automatically reflected without a rebuild.
Secrets — mount sensitive values like API keys without exposing them as plaintext.
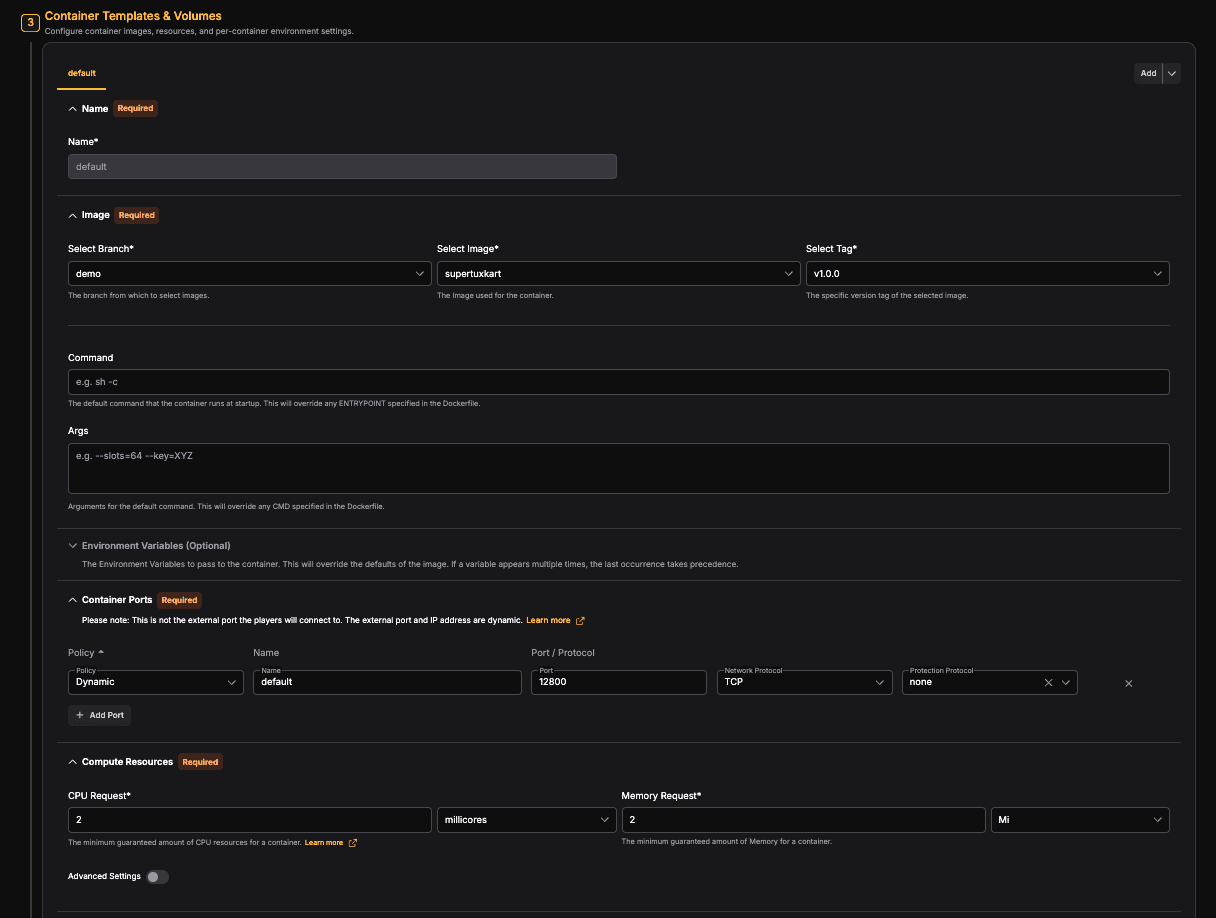
When you have what you need filled in, hit ‘Next’.
Advanced & Protection
This is the final page you’ll use to set up your ArmadaSet. It covers numerous optional, though important, functionality that you can enable on your game servers for protection, observability, health, lifecycle checks, and your update strategy.
This is the final page you’ll use to set up your ArmadaSet. It covers numerous optional, though important, functionality that you can enable on your game servers for protection, observability, health, lifecycle checks, and your update strategy.
Here are a few worth setting before you finalize:
Observability (Profiling) — eBPF-based CPU profiling at around 2-3% overhead. Safe in production. Check the box and you’ll have performance data from day one.
Container Health (Health Checks) — though disabled by default for initial testing, you’ll want this enabled for production. Without them, unresponsive servers can't be detected or cleaned up automatically.
Game Server Termination (Termination Grace Period) — how long your server gets to wind down before a forced shutdown. Default is 30 seconds but can be adjusted to match your typical session length.
Update Strategy (Strategy) — Modifies the behavior of Armada server updates. You’ll have three options to choose from.
Use Default: uses the system default strategy. A good place to start and what we’ll choose for this guide.
RollingUpdate: transitions game servers from the old version to the new one gradually, adding new servers before removing old ones. Safer for production, as active sessions aren’t disrupted.
Recreate: terminates all non-allocated game servers immediately and replaces them with the new version. Faster, but all ‘Ready’ servers are removed at once.
Skip for now — these options either require prior setup or are fine on defaults:
SteelShield (Gateway Policies) — controls outbound traffic bypass for game servers via GatewayPolicies. Requires these policies to be configured first, we’ll skip for now.
Shutdown Notification — this controls how long an allocated server has to begin graceful shutdown in different scenarios. The defaults are sensible, so we don’t need to change these. Leave them unless you have specific requirements.
Autoscaling (Sync Interval) — ‘Sync Interval’ sets the time between each autoscaling action in seconds. Default is 30 sec., and we recommend leaving it as is.
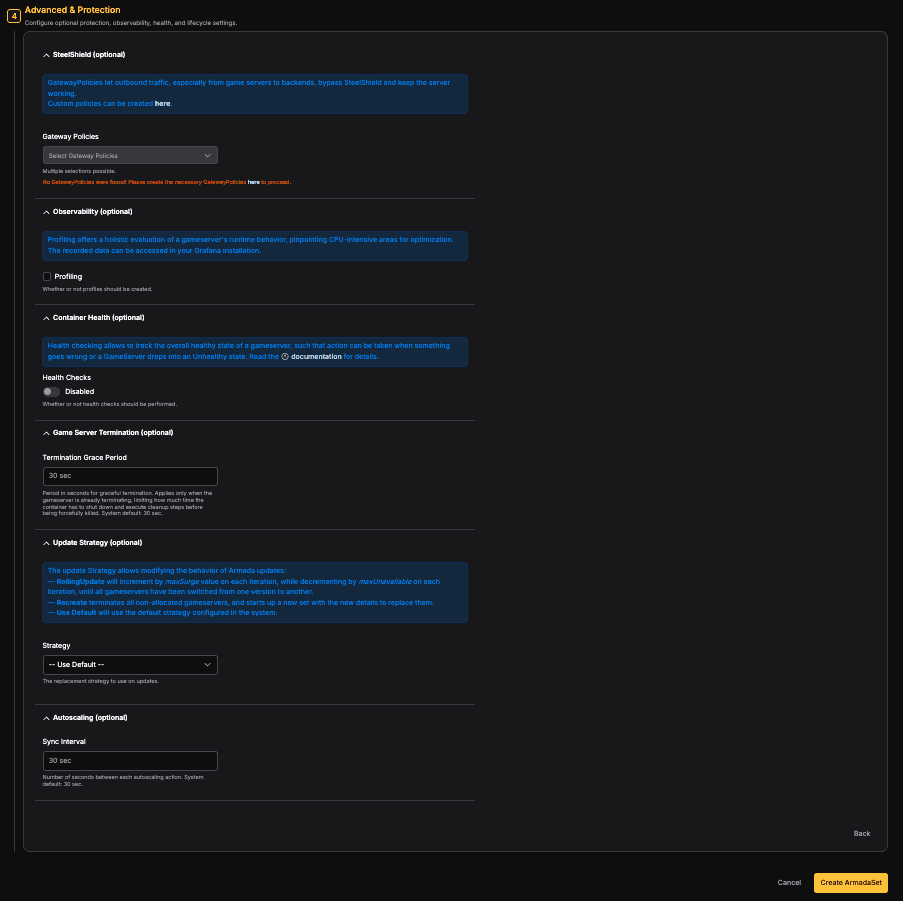
And that’s it! Once everything is in order, you can go ahead and hit ‘Create ArmadaSet’!

Your new ArmadaSet should now populate the ArmadaSets page, where you can get a quick overview on it.
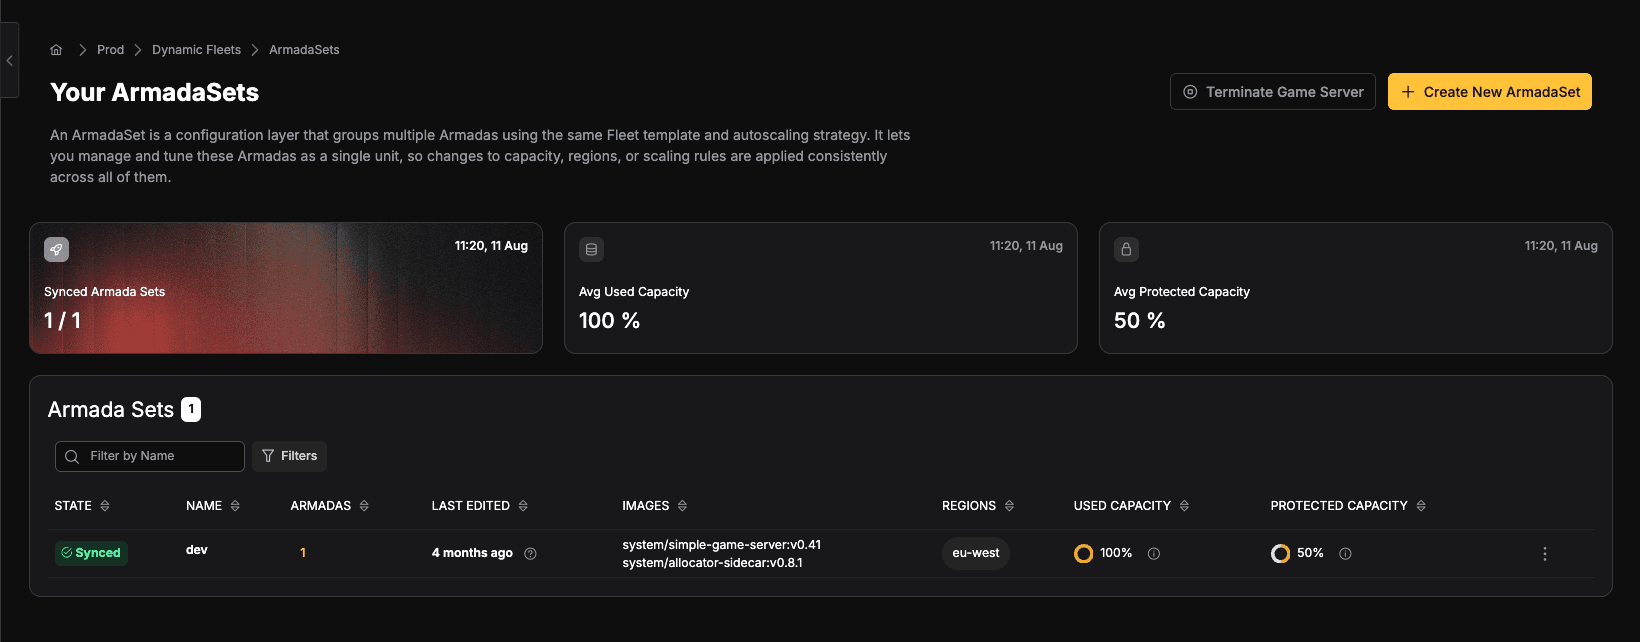
You can click on the triple-dot menu on the far right of your newly created ArmadaSet. This will present a menu with a few options (like converting your ArmadaSet to an Armada or vice versa). For now, hit Details.
This page lets you edit and adjust the settings you’ve just established for your ArmadaSet. You also get in-depth information on the state of your ArmadaSet and the Armadas within it.
Feel free to explore around!
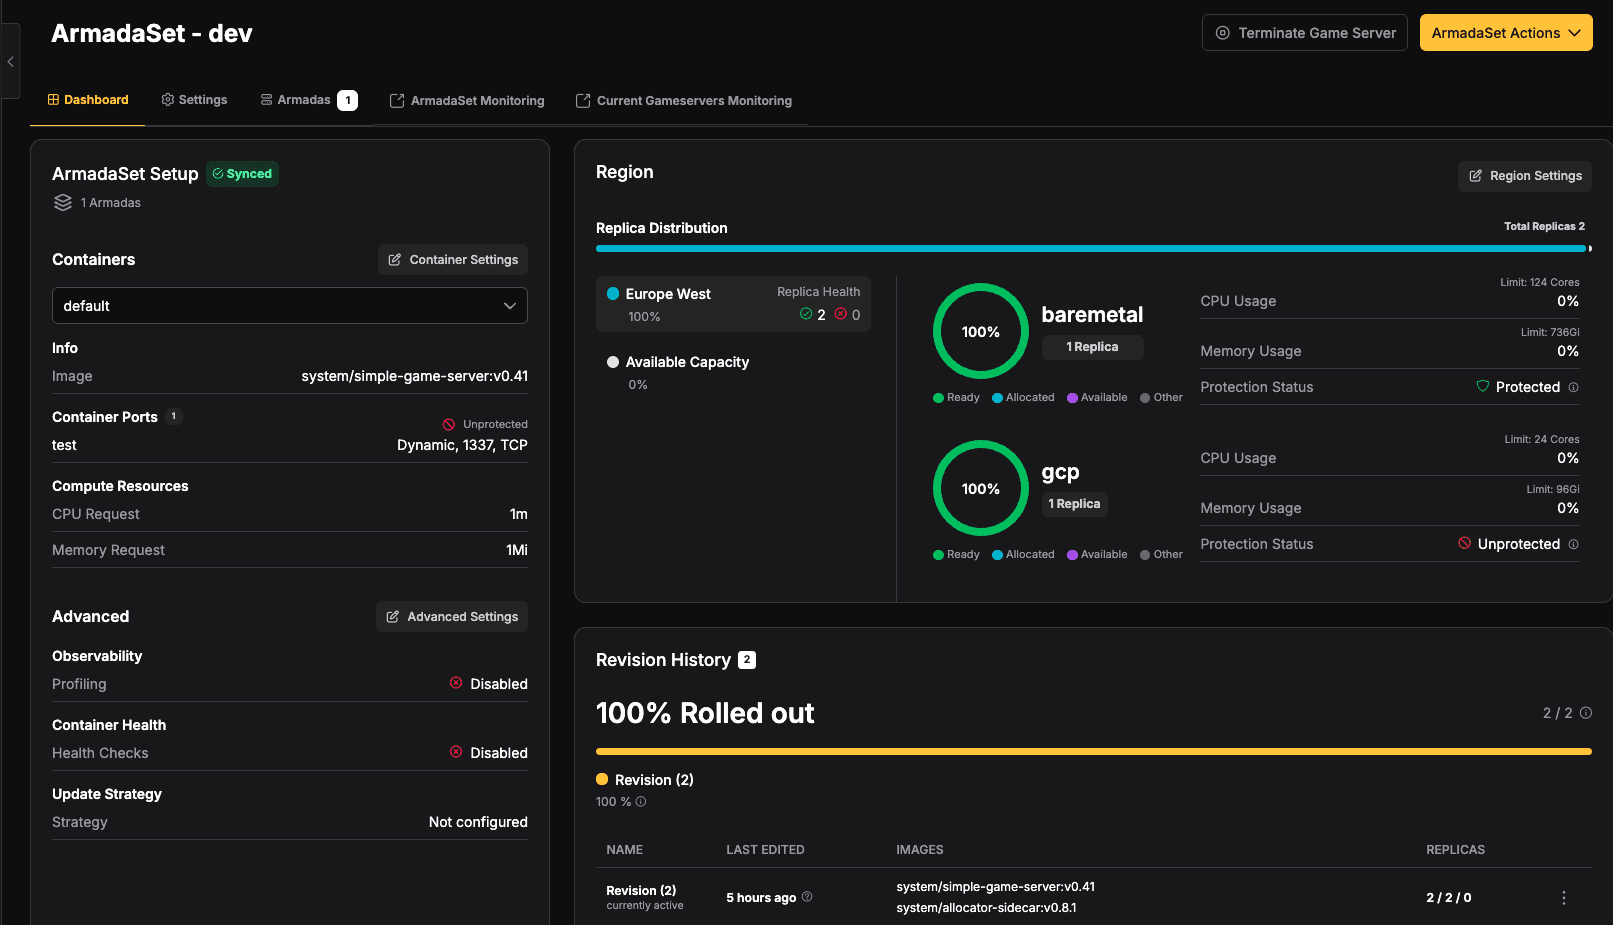
Congratulations! You’ve successfully deployed your first ArmadaSet running in GameFabric. From here, you can spin up and down your session-based game servers across the globe through one easy configuration.
If you want a more detailed overview on Armadas and ArmadaSets, read more in our official documentation.
Check out our other guides:

Weave GameFabric Into Your Game.
Get Started
" width="241.00000677795038px"><path d="M 10.788 15.54 L 10.788 12.125 L 17.613 12.125 L 17.613 24.25 C 16.983 24.409 15.699 24.584 13.762 24.775 C 11.848 24.957 10.453 25.06 9.592 25.06 C 5.948 25.06 3.444 24.06 2.065 22.059 C 0.686 20.058 0 16.937 0 12.681 C 0 8.425 0.702 5.288 2.097 3.343 C 3.516 1.398 5.972 0.413 9.448 0.413 C 12.925 0.413 13.81 0.643 16.377 1.112 L 17.605 1.358 L 17.461 4.431 C 14.639 4.058 12.111 3.875 9.871 3.875 C 7.63 3.875 6.092 4.502 5.246 5.757 C 4.425 7.012 4.019 9.33 4.019 12.721 C 4.019 16.111 4.401 18.454 5.175 19.756 C 5.964 21.035 7.559 21.678 9.927 21.678 C 12.295 21.678 12.901 21.574 13.738 21.368 L 13.738 15.556 L 10.764 15.556 L 10.788 15.556 Z M 34.979 12.61 L 34.979 20.558 C 35.003 21.074 35.13 21.455 35.361 21.709 C 35.617 21.94 35.999 22.091 36.518 22.162 L 36.414 25.06 C 34.405 25.06 32.858 24.624 31.758 23.766 C 29.892 24.624 28.018 25.06 26.12 25.06 C 22.644 25.06 20.906 23.21 20.906 19.518 C 20.906 15.826 21.368 16.477 22.301 15.683 C 23.258 14.896 24.717 14.42 26.679 14.245 L 31.191 13.864 L 31.191 12.61 C 31.191 11.681 30.976 11.037 30.562 10.664 C 30.163 10.291 29.565 10.108 28.776 10.108 C 27.285 10.108 25.419 10.196 23.178 10.394 L 22.054 10.466 L 21.911 7.782 C 24.454 7.178 26.79 6.877 28.903 6.877 C 31.016 6.877 32.595 7.337 33.528 8.266 C 34.484 9.171 34.955 10.632 34.955 12.618 Z M 27.141 16.929 C 25.53 17.072 24.725 17.938 24.725 19.542 C 24.725 21.146 25.435 21.948 26.862 21.948 C 28.289 21.948 29.262 21.765 30.57 21.392 L 31.199 21.177 L 31.199 16.54 L 27.141 16.921 L 27.133 16.921 Z M 43.59 24.671 L 39.779 24.671 L 39.779 7.242 L 43.558 7.242 L 43.558 8.322 C 45.208 7.345 46.731 6.861 48.111 6.861 C 50.136 6.861 51.619 7.424 52.552 8.568 C 54.673 7.424 56.794 6.861 58.891 6.861 C 60.988 6.861 62.471 7.504 63.332 8.806 C 64.193 10.084 64.631 12.26 64.631 15.317 L 64.631 24.655 L 60.852 24.655 L 60.852 15.413 C 60.852 13.531 60.661 12.189 60.254 11.403 C 59.879 10.617 59.09 10.219 57.87 10.219 C 56.65 10.219 55.693 10.45 54.473 10.918 L 53.875 11.164 C 54.059 11.625 54.162 13.11 54.162 15.627 L 54.162 24.655 L 50.383 24.655 L 50.383 15.698 C 50.383 13.626 50.2 12.205 49.825 11.411 C 49.45 10.624 48.637 10.227 47.369 10.227 C 46.101 10.227 45.121 10.458 44.116 10.926 L 43.59 11.141 L 43.59 24.663 L 43.598 24.663 Z M 81.559 21.527 L 82.539 21.424 L 82.611 24.25 C 79.956 24.782 77.596 25.044 75.547 25.044 C 73.498 25.044 71.082 24.338 69.949 22.916 C 68.833 21.503 68.267 19.232 68.267 16.119 C 68.267 9.942 70.803 6.853 75.858 6.853 C 80.913 6.853 83.209 9.505 83.209 14.833 L 82.962 17.549 L 72.11 17.549 C 72.134 18.994 72.445 20.042 73.051 20.717 C 73.657 21.392 74.781 21.725 76.448 21.725 C 78.114 21.725 79.804 21.654 81.559 21.511 L 81.551 21.511 Z M 79.454 14.634 C 79.454 12.919 79.167 11.712 78.608 11.037 C 78.074 10.339 77.149 9.989 75.842 9.989 C 74.534 9.989 73.577 10.354 72.971 11.069 C 72.381 11.784 72.086 12.975 72.062 14.626 L 79.454 14.626 Z M 87.315 24.671 L 87.315 0.786 L 102.185 0.786 L 102.185 4.169 L 91.198 4.169 L 91.198 12.213 L 100.336 12.213 L 100.336 15.595 L 91.198 15.595 L 91.198 24.655 L 87.315 24.655 Z M 117.494 12.61 L 117.494 20.558 C 117.518 21.074 117.646 21.455 117.877 21.709 C 118.132 21.94 118.515 22.091 119.033 22.162 L 118.929 25.06 C 116.92 25.06 115.373 24.624 114.273 23.766 C 112.407 24.624 110.533 25.06 108.636 25.06 C 105.159 25.06 103.421 23.21 103.421 19.518 C 103.421 15.826 103.884 16.477 104.817 15.683 C 105.773 14.896 107.232 14.42 109.194 14.245 L 113.707 13.864 L 113.707 12.61 C 113.707 11.681 113.491 11.037 113.077 10.664 C 112.678 10.291 112.08 10.108 111.291 10.108 C 109.8 10.108 107.934 10.196 105.694 10.394 L 104.569 10.466 L 104.426 7.782 C 106.969 7.178 109.306 6.877 111.418 6.877 C 113.531 6.877 115.11 7.337 116.043 8.266 C 117 9.171 117.486 10.632 117.486 12.618 L 117.478 12.618 Z M 109.64 16.929 C 108.03 17.072 107.225 17.938 107.225 19.542 C 107.225 21.146 107.934 21.948 109.361 21.948 C 110.789 21.948 111.761 21.765 113.069 21.392 L 113.699 21.177 L 113.699 16.54 L 109.64 16.921 L 109.632 16.921 Z M 130.427 6.853 C 132.827 6.853 134.557 7.528 135.609 8.87 C 136.686 10.196 137.22 12.554 137.22 15.945 C 137.22 19.335 136.59 21.709 135.33 23.051 C 134.07 24.377 131.854 25.044 128.681 25.044 C 125.507 25.044 125.842 24.941 123.466 24.735 L 122.278 24.632 L 122.278 0 L 126.057 0 L 126.057 7.917 C 127.668 7.218 129.127 6.869 130.435 6.869 L 130.411 6.869 Z M 128.689 21.67 C 130.554 21.67 131.79 21.233 132.396 20.375 C 133.026 19.494 133.337 18.001 133.337 15.913 C 133.337 13.824 133.074 12.355 132.54 11.522 C 132.021 10.664 131.168 10.227 129.988 10.227 C 128.808 10.227 127.748 10.402 126.631 10.752 L 126.073 10.926 L 126.073 21.519 C 127.357 21.606 128.234 21.662 128.697 21.662 L 128.689 21.662 Z M 141.047 24.671 L 141.047 7.242 L 144.826 7.242 L 144.826 9.33 C 146.812 8.052 148.789 7.226 150.774 6.853 L 150.774 10.648 C 148.765 11.045 147.051 11.553 145.632 12.181 L 144.858 12.49 L 144.858 24.655 L 141.039 24.655 Z M 153.685 24.671 L 153.685 7.242 L 157.496 7.242 L 157.496 24.671 Z M 153.685 4.28 L 153.685 0.27 L 157.496 0.27 L 157.496 4.28 Z M 168.674 6.853 C 169.91 6.853 171.369 7.012 173.044 7.337 L 173.913 7.512 L 173.769 10.513 C 171.928 10.331 170.564 10.227 169.671 10.227 C 167.893 10.227 166.713 10.624 166.099 11.411 C 165.485 12.197 165.19 13.69 165.19 15.873 C 165.19 18.057 165.485 19.566 166.059 20.407 C 166.649 21.249 167.853 21.662 169.703 21.662 L 173.801 21.376 L 173.905 24.401 C 171.553 24.814 169.775 25.029 168.579 25.029 C 165.924 25.029 164.034 24.322 162.942 22.901 C 161.865 21.455 161.331 19.113 161.331 15.865 C 161.331 12.618 161.897 10.299 163.045 8.925 C 164.194 7.536 166.059 6.837 168.643 6.837 L 168.674 6.861 Z" fill="rgb(255, 255, 255)" height="25.060368660573836px" id="m9666rVI6" transform="translate(67.087 8.298)" width="173.91293249816522px"/><path d="M 0.008 28.157 L 2.886 34.025 C 2.886 34.025 12.454 29.372 20.085 21.336 C 25.435 15.691 29.756 8.401 29.684 0 L 23.138 0 L 23.138 0.064 C 23.202 6.718 19.566 12.395 15.333 16.866 C 8.547 24.004 0.024 28.165 0.024 28.165 L 0 28.165 Z" fill="rgb(255, 212, 97)" height="34.02524708069963px" id="uqbA7kHz5" transform="translate(0 0.024)" width="29.685357387717968px"/><path d="M 15.133 8.099 C 8.866 2.906 2.878 0 2.878 0 L 0 5.868 C 0 5.868 5.047 8.33 10.461 12.721 C 11.617 11.72 12.773 10.64 13.881 9.473 C 14.304 9.028 14.727 8.576 15.125 8.099 Z M 23.115 33.978 L 23.115 34.041 L 29.677 34.041 C 29.74 26.966 26.687 20.685 22.524 15.5 C 22.182 15.881 21.839 16.254 21.488 16.628 C 20.3 17.866 19.072 19.041 17.844 20.121 C 20.898 24.052 23.17 28.705 23.115 33.978 Z" fill="rgb(255, 255, 255)" height="34.04112843639365px" id="Ni0QbDft0" transform="translate(0 6.067)" width="29.67748264328058px"/><path d="M 29.693 5.868 L 26.815 0 C 26.815 0 17.247 4.653 9.616 12.689 C 4.266 18.335 -0.063 25.624 0.001 34.025 L 6.563 34.025 L 6.563 33.962 C 6.499 27.308 10.135 21.63 14.376 17.16 C 21.162 10.013 29.677 5.852 29.677 5.852 L 29.685 5.852 Z" fill="rgb(255, 255, 255)" height="34.02524708100746px" id="nbB1ROpYt" transform="translate(23.098 6.067)" width="29.693145591227903px"/><path d="M 11.841 13.928 C 10.613 15.008 9.386 16.183 8.198 17.422 C 7.847 17.795 7.504 18.168 7.161 18.549 C 2.991 13.356 -0.063 7.075 0.001 0 L 6.563 0 L 6.563 0.064 C 6.523 5.344 8.795 9.997 11.849 13.928 Z M 14.544 25.926 L 14.552 25.926 C 14.951 25.449 15.373 24.997 15.796 24.552 C 16.904 23.385 18.06 22.305 19.217 21.304 C 24.63 25.711 29.693 28.173 29.693 28.173 L 26.815 34.041 C 26.815 34.041 20.819 31.127 14.544 25.934 Z" fill="rgb(255, 212, 97)" height="34.04112771635735px" id="dJSBwgU64" transform="translate(23.106 0)" width="29.69343092334134px"/><g d="M 6.578 18.041 L 2.926 8.052 C 2.894 7.964 2.791 7.909 2.703 7.941 C 2.631 7.964 2.583 8.028 2.583 8.115 L 2.583 17.977 C 2.583 18.081 2.504 18.152 2.408 18.152 L 0.175 18.152 C 0.072 18.152 0 18.073 0 17.977 L 0 0.183 C 0 0.079 0.08 0.008 0.175 0.008 L 2.312 0.008 C 2.384 0.008 2.456 0.056 2.472 0.119 L 6.1 10.069 C 6.131 10.156 6.235 10.212 6.331 10.172 C 6.403 10.14 6.442 10.084 6.442 10.013 L 6.442 0.199 C 6.442 0.095 6.522 0.024 6.618 0.024 L 8.834 0.024 C 8.938 0.024 9.018 0.103 9.018 0.206 L 9.018 18.001 C 9.018 18.104 8.938 18.176 8.834 18.176 L 6.713 18.176 C 6.642 18.176 6.57 18.128 6.554 18.057 L 6.562 18.057 Z M 10.341 17.977 L 10.341 0.183 C 10.341 0.079 10.421 0.008 10.517 0.008 L 12.733 0.008 C 12.837 0.008 12.909 0.087 12.909 0.183 L 12.909 17.977 C 12.909 18.081 12.829 18.152 12.733 18.152 L 10.517 18.152 C 10.413 18.152 10.341 18.073 10.341 17.977 Z M 17.254 17.977 L 17.254 2.612 C 17.254 2.509 17.174 2.438 17.079 2.438 L 14.4 2.438 C 14.296 2.438 14.224 2.358 14.224 2.263 L 14.224 0.191 C 14.224 0.087 14.304 0.016 14.4 0.016 L 22.756 0.016 C 22.843 0.016 22.931 0.095 22.931 0.199 L 22.931 2.271 C 22.931 2.374 22.851 2.446 22.756 2.446 L 20.021 2.446 C 19.917 2.446 19.845 2.525 19.845 2.62 L 19.845 17.985 C 19.845 18.089 19.766 18.16 19.67 18.16 L 17.453 18.16 C 17.35 18.16 17.278 18.081 17.278 17.985 L 17.246 17.985 Z M 24.231 17.977 L 24.231 0.183 C 24.231 0.079 24.31 0.008 24.406 0.008 L 28.76 0.008 C 29.956 0.008 30.96 0.421 31.773 1.263 C 32.571 2.072 33.009 3.168 32.993 4.312 L 32.993 5.995 C 32.993 7.607 32.324 8.862 30.992 9.751 C 30.92 9.791 30.888 9.886 30.92 9.95 L 33.536 17.914 C 33.567 18.001 33.512 18.104 33.424 18.136 L 31.024 18.136 C 30.944 18.136 30.88 18.089 30.849 18.017 L 28.473 10.482 C 28.449 10.41 28.385 10.362 28.297 10.362 L 26.982 10.362 C 26.878 10.362 26.806 10.442 26.806 10.537 L 26.806 17.962 C 26.806 18.065 26.726 18.136 26.631 18.136 L 24.414 18.136 C 24.31 18.136 24.239 18.057 24.239 17.962 L 24.231 17.962 Z M 29.956 7.544 L 29.979 7.52 C 30.131 7.321 30.251 7.099 30.314 6.853 C 30.386 6.583 30.418 6.297 30.402 6.003 L 30.402 4.304 C 30.402 3.748 30.251 3.287 29.948 2.938 C 29.645 2.589 29.206 2.422 28.64 2.422 L 26.974 2.422 C 26.87 2.422 26.798 2.501 26.798 2.597 L 26.798 7.917 C 26.798 8.02 26.878 8.091 26.974 8.091 L 28.616 8.091 C 29.126 8.099 29.613 7.901 29.964 7.536 L 29.956 7.536 Z M 34.955 17.938 L 38.662 0.143 C 38.686 0.064 38.75 0 38.838 0 L 41.054 0 C 41.134 0 41.206 0.064 41.23 0.143 L 45.192 17.938 C 45.216 18.025 45.153 18.128 45.057 18.152 L 42.601 18.152 C 42.521 18.152 42.442 18.089 42.426 18.009 L 41.756 14.396 C 41.732 14.317 41.668 14.253 41.581 14.253 L 38.527 14.253 C 38.447 14.253 38.367 14.317 38.351 14.396 L 37.682 18.009 C 37.658 18.089 37.594 18.152 37.506 18.152 L 35.122 18.152 C 35.019 18.152 34.947 18.073 34.947 17.977 L 34.947 17.938 L 34.923 17.938 Z M 39.029 11.839 L 41.046 11.839 C 41.15 11.839 41.222 11.76 41.222 11.665 L 41.222 11.633 L 40.217 6.313 C 40.193 6.225 40.106 6.154 40.002 6.17 C 39.93 6.178 39.882 6.241 39.858 6.313 L 38.854 11.633 C 38.83 11.72 38.894 11.816 38.997 11.831 L 39.029 11.831 Z M 50.63 0.016 C 51.754 0.008 52.839 0.453 53.62 1.255 C 54.441 2.033 54.896 3.113 54.888 4.232 L 54.888 13.674 C 54.888 14.976 54.481 16.056 53.684 16.897 C 52.887 17.739 51.842 18.16 50.551 18.16 L 46.707 18.16 C 46.604 18.16 46.532 18.081 46.532 17.985 L 46.532 0.191 C 46.532 0.087 46.612 0.016 46.707 0.016 Z M 52.313 13.682 L 52.313 4.232 C 52.321 3.748 52.129 3.295 51.762 2.97 C 51.404 2.636 50.933 2.454 50.447 2.462 L 49.291 2.462 C 49.187 2.462 49.115 2.541 49.115 2.636 L 49.115 15.579 C 49.115 15.683 49.195 15.754 49.291 15.754 L 50.367 15.754 C 51.667 15.73 52.305 15.047 52.305 13.674 L 52.313 13.674 Z M 56.961 1.866 C 57.368 1.302 57.894 0.834 58.516 0.516 C 59.114 0.191 59.784 0.024 60.469 0.024 C 61.155 0.024 61.745 0.159 62.327 0.429 C 62.885 0.683 63.38 1.056 63.77 1.533 C 64.129 1.945 64.392 2.43 64.56 2.946 C 64.703 3.462 64.775 3.986 64.775 4.518 L 64.775 13.594 C 64.775 14.071 64.735 14.531 64.623 15 C 64.488 15.484 64.28 15.937 63.993 16.35 C 63.627 16.882 63.14 17.326 62.574 17.628 C 61.952 17.985 61.259 18.16 60.549 18.16 C 59.839 18.16 58.938 17.946 58.237 17.517 C 57.535 17.096 57.041 16.596 56.77 16.064 C 56.499 15.532 56.323 15.087 56.275 14.754 C 56.212 14.372 56.196 13.975 56.196 13.594 L 56.196 4.518 C 56.196 4.042 56.243 3.565 56.371 3.105 C 56.491 2.66 56.706 2.247 56.969 1.874 L 56.977 1.874 Z M 61.896 3.272 C 61.538 2.795 61.083 2.541 60.509 2.541 C 59.935 2.541 59.879 2.628 59.616 2.795 C 59.321 2.97 59.106 3.152 58.994 3.359 C 58.883 3.549 58.803 3.764 58.763 3.986 C 58.731 4.169 58.715 4.343 58.715 4.518 L 58.715 13.602 C 58.715 13.793 58.739 13.999 58.755 14.19 C 58.779 14.404 58.93 14.698 59.178 15.055 C 59.425 15.413 59.879 15.603 60.509 15.603 C 61.139 15.603 61.115 15.532 61.37 15.373 C 61.601 15.254 61.793 15.071 61.928 14.857 C 62.032 14.682 62.112 14.491 62.152 14.293 C 62.191 14.063 62.215 13.832 62.215 13.594 L 62.215 4.526 C 62.215 4.272 62.215 4.018 62.176 3.78 C 62.152 3.637 62.056 3.47 61.904 3.264 Z M 17.605 22.567 L 47.162 22.567 C 47.266 22.567 47.337 22.646 47.337 22.742 C 47.337 22.837 47.313 22.845 47.274 22.877 L 32.499 35.725 C 32.427 35.788 32.34 35.788 32.268 35.725 L 17.485 22.877 C 17.414 22.813 17.406 22.702 17.461 22.623 C 17.493 22.583 17.541 22.559 17.597 22.559 L 17.605 22.559 Z" fill="transparent" height="35.77216682791713px" id="nW35hldu7" transform="translate(176.137 42.228)" width="64.7748272532856px"><path d="M 6.578 18.041 L 2.926 8.052 C 2.894 7.964 2.791 7.909 2.703 7.941 C 2.631 7.964 2.583 8.028 2.583 8.115 L 2.583 17.977 C 2.583 18.081 2.504 18.152 2.408 18.152 L 0.175 18.152 C 0.072 18.152 0 18.073 0 17.977 L 0 0.183 C 0 0.079 0.08 0.008 0.175 0.008 L 2.312 0.008 C 2.384 0.008 2.456 0.056 2.472 0.119 L 6.1 10.069 C 6.131 10.156 6.235 10.212 6.331 10.172 C 6.403 10.14 6.442 10.084 6.442 10.013 L 6.442 0.199 C 6.442 0.095 6.522 0.024 6.618 0.024 L 8.834 0.024 C 8.938 0.024 9.018 0.103 9.018 0.206 L 9.018 18.001 C 9.018 18.104 8.938 18.176 8.834 18.176 L 6.713 18.176 C 6.642 18.176 6.57 18.128 6.554 18.057 L 6.562 18.057 Z M 10.341 17.977 L 10.341 0.183 C 10.341 0.079 10.421 0.008 10.517 0.008 L 12.733 0.008 C 12.837 0.008 12.909 0.087 12.909 0.183 L 12.909 17.977 C 12.909 18.081 12.829 18.152 12.733 18.152 L 10.517 18.152 C 10.413 18.152 10.341 18.073 10.341 17.977 Z M 17.254 17.977 L 17.254 2.612 C 17.254 2.509 17.174 2.438 17.079 2.438 L 14.4 2.438 C 14.296 2.438 14.224 2.358 14.224 2.263 L 14.224 0.191 C 14.224 0.087 14.304 0.016 14.4 0.016 L 22.756 0.016 C 22.843 0.016 22.931 0.095 22.931 0.199 L 22.931 2.271 C 22.931 2.374 22.851 2.446 22.756 2.446 L 20.021 2.446 C 19.917 2.446 19.845 2.525 19.845 2.62 L 19.845 17.985 C 19.845 18.089 19.766 18.16 19.67 18.16 L 17.453 18.16 C 17.35 18.16 17.278 18.081 17.278 17.985 L 17.246 17.985 Z M 24.231 17.977 L 24.231 0.183 C 24.231 0.079 24.31 0.008 24.406 0.008 L 28.76 0.008 C 29.956 0.008 30.96 0.421 31.773 1.263 C 32.571 2.072 33.009 3.168 32.993 4.312 L 32.993 5.995 C 32.993 7.607 32.324 8.862 30.992 9.751 C 30.92 9.791 30.888 9.886 30.92 9.95 L 33.536 17.914 C 33.567 18.001 33.512 18.104 33.424 18.136 L 31.024 18.136 C 30.944 18.136 30.88 18.089 30.849 18.017 L 28.473 10.482 C 28.449 10.41 28.385 10.362 28.297 10.362 L 26.982 10.362 C 26.878 10.362 26.806 10.442 26.806 10.537 L 26.806 17.962 C 26.806 18.065 26.726 18.136 26.631 18.136 L 24.414 18.136 C 24.31 18.136 24.239 18.057 24.239 17.962 L 24.231 17.962 Z M 29.956 7.544 L 29.979 7.52 C 30.131 7.321 30.251 7.099 30.314 6.853 C 30.386 6.583 30.418 6.297 30.402 6.003 L 30.402 4.304 C 30.402 3.748 30.251 3.287 29.948 2.938 C 29.645 2.589 29.206 2.422 28.64 2.422 L 26.974 2.422 C 26.87 2.422 26.798 2.501 26.798 2.597 L 26.798 7.917 C 26.798 8.02 26.878 8.091 26.974 8.091 L 28.616 8.091 C 29.126 8.099 29.613 7.901 29.964 7.536 L 29.956 7.536 Z M 34.955 17.938 L 38.662 0.143 C 38.686 0.064 38.75 0 38.838 0 L 41.054 0 C 41.134 0 41.206 0.064 41.23 0.143 L 45.192 17.938 C 45.216 18.025 45.153 18.128 45.057 18.152 L 42.601 18.152 C 42.521 18.152 42.442 18.089 42.426 18.009 L 41.756 14.396 C 41.732 14.317 41.668 14.253 41.581 14.253 L 38.527 14.253 C 38.447 14.253 38.367 14.317 38.351 14.396 L 37.682 18.009 C 37.658 18.089 37.594 18.152 37.506 18.152 L 35.122 18.152 C 35.019 18.152 34.947 18.073 34.947 17.977 L 34.947 17.938 L 34.923 17.938 Z M 39.029 11.839 L 41.046 11.839 C 41.15 11.839 41.222 11.76 41.222 11.665 L 41.222 11.633 L 40.217 6.313 C 40.193 6.225 40.106 6.154 40.002 6.17 C 39.93 6.178 39.882 6.241 39.858 6.313 L 38.854 11.633 C 38.83 11.72 38.894 11.816 38.997 11.831 L 39.029 11.831 Z M 50.63 0.016 C 51.754 0.008 52.839 0.453 53.62 1.255 C 54.441 2.033 54.896 3.113 54.888 4.232 L 54.888 13.674 C 54.888 14.976 54.481 16.056 53.684 16.897 C 52.887 17.739 51.842 18.16 50.551 18.16 L 46.707 18.16 C 46.604 18.16 46.532 18.081 46.532 17.985 L 46.532 0.191 C 46.532 0.087 46.612 0.016 46.707 0.016 Z M 52.313 13.682 L 52.313 4.232 C 52.321 3.748 52.129 3.295 51.762 2.97 C 51.404 2.636 50.933 2.454 50.447 2.462 L 49.291 2.462 C 49.187 2.462 49.115 2.541 49.115 2.636 L 49.115 15.579 C 49.115 15.683 49.195 15.754 49.291 15.754 L 50.367 15.754 C 51.667 15.73 52.305 15.047 52.305 13.674 L 52.313 13.674 Z M 56.961 1.866 C 57.368 1.302 57.894 0.834 58.516 0.516 C 59.114 0.191 59.784 0.024 60.469 0.024 C 61.155 0.024 61.745 0.159 62.327 0.429 C 62.885 0.683 63.38 1.056 63.77 1.533 C 64.129 1.945 64.392 2.43 64.56 2.946 C 64.703 3.462 64.775 3.986 64.775 4.518 L 64.775 13.594 C 64.775 14.071 64.735 14.531 64.623 15 C 64.488 15.484 64.28 15.937 63.993 16.35 C 63.627 16.882 63.14 17.326 62.574 17.628 C 61.952 17.985 61.259 18.16 60.549 18.16 C 59.839 18.16 58.938 17.946 58.237 17.517 C 57.535 17.096 57.041 16.596 56.77 16.064 C 56.499 15.532 56.323 15.087 56.275 14.754 C 56.212 14.372 56.196 13.975 56.196 13.594 L 56.196 4.518 C 56.196 4.042 56.243 3.565 56.371 3.105 C 56.491 2.66 56.706 2.247 56.969 1.874 L 56.977 1.874 Z M 61.896 3.272 C 61.538 2.795 61.083 2.541 60.509 2.541 C 59.935 2.541 59.879 2.628 59.616 2.795 C 59.321 2.97 59.106 3.152 58.994 3.359 C 58.883 3.549 58.803 3.764 58.763 3.986 C 58.731 4.169 58.715 4.343 58.715 4.518 L 58.715 13.602 C 58.715 13.793 58.739 13.999 58.755 14.19 C 58.779 14.404 58.93 14.698 59.178 15.055 C 59.425 15.413 59.879 15.603 60.509 15.603 C 61.139 15.603 61.115 15.532 61.37 15.373 C 61.601 15.254 61.793 15.071 61.928 14.857 C 62.032 14.682 62.112 14.491 62.152 14.293 C 62.191 14.063 62.215 13.832 62.215 13.594 L 62.215 4.526 C 62.215 4.272 62.215 4.018 62.176 3.78 C 62.152 3.637 62.056 3.47 61.904 3.264 Z M 17.605 22.567 L 47.162 22.567 C 47.266 22.567 47.337 22.646 47.337 22.742 C 47.337 22.837 47.313 22.845 47.274 22.877 L 32.499 35.725 C 32.427 35.788 32.34 35.788 32.268 35.725 L 17.485 22.877 C 17.414 22.813 17.406 22.702 17.461 22.623 C 17.493 22.583 17.541 22.559 17.597 22.559 L 17.605 22.559 Z" fill="rgb(255, 212, 97)" height="35.77216682791713px" id="nxMuzWHZo" width="64.7748272532856px"/></g><path d="M 0.024 0 L 3.492 0 C 4.409 0 5.103 0.183 5.557 0.548 C 6.02 0.913 6.243 1.509 6.243 2.327 C 6.243 3.144 6.171 3.208 6.02 3.502 C 5.876 3.788 5.621 4.05 5.262 4.272 C 5.653 4.439 5.94 4.677 6.123 4.987 C 6.307 5.296 6.403 5.725 6.403 6.281 C 6.403 7.139 6.147 7.766 5.645 8.187 C 5.143 8.6 4.433 8.806 3.524 8.806 L 0 8.806 L 0 0 Z M 3.405 1.525 L 1.818 1.525 L 1.818 3.621 L 3.421 3.621 C 4.098 3.621 4.433 3.272 4.433 2.573 C 4.433 1.874 4.09 1.525 3.405 1.525 Z M 3.46 5.13 L 1.826 5.13 L 1.826 7.281 L 3.46 7.281 C 3.851 7.281 4.138 7.202 4.322 7.051 C 4.505 6.892 4.601 6.614 4.601 6.194 C 4.601 5.487 4.218 5.13 3.46 5.13 Z M 11.218 8.806 L 9.424 8.806 L 9.424 5.249 L 6.698 0.008 L 8.683 0.008 L 10.309 3.518 L 11.936 0.008 L 13.921 0.008 L 11.218 5.249 Z" fill="rgb(255, 212, 97)" height="8.806067448298528px" id="CLXvdG6iT" transform="translate(155.351 46.992)" width="13.92132578580231px"/></g></svg>)